


How to Select a Sublimation Printer?
Many individuals new to the heat transfer industry often ask: What type of printer is required for sublimation? Which brands and models are recommended? With 20 years of experience in this field, I am here to provide professional insights. Please follow us for ongoing updates on common issues and solutions in heat transfer printing.
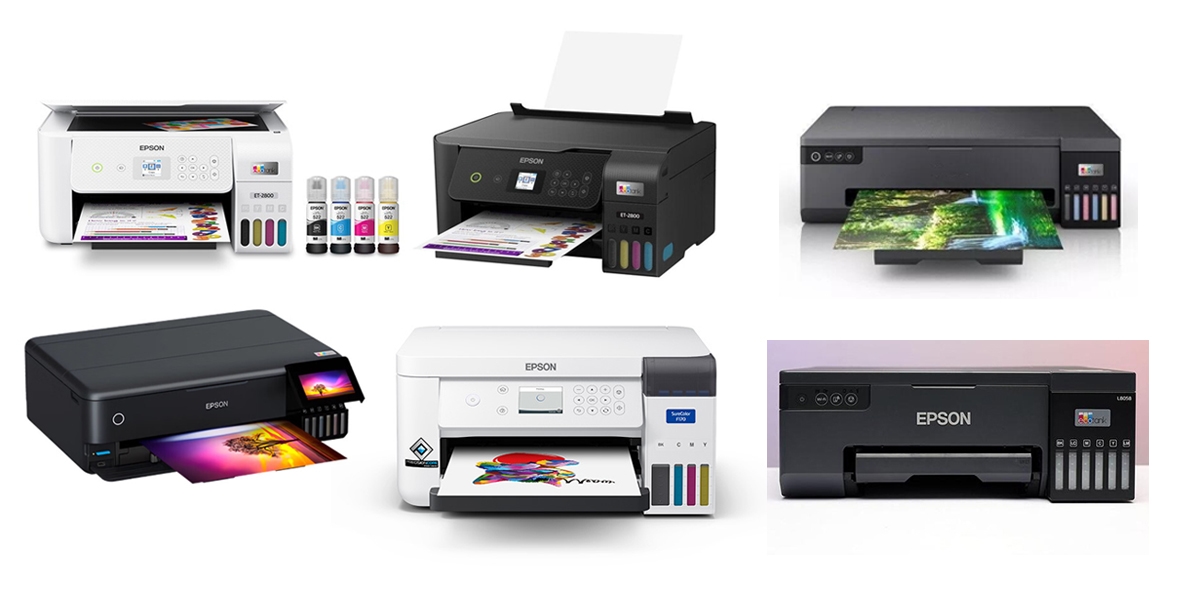
1. What Kind of Printer is Required for Heat Transfer Printing?
Generally, sublimation transfer requires an inkjet printer. However, not all inkjet printers are suitable; the printer must be equipped with a micro-piezo printhead. Suitable models include, but are not limited to, the Epson SureColor F170, Epson EcoTank ET-2800, Epson EcoTank ET-15000, Epson EcoTank L18058, Epson EcoTank ET-8550, and the Brother SP-1.
The optimal choice depends on the user’s budget and specific printing requirements.
2. How to Choose Between a 4-Color and a 6-Color Printer?
The decision should be based on your specific application needs.
4-Color Printers: If budget is a primary concern, a 4-color printer offers a more economical solution. However, a potential drawback is that color vibrancy and fine details may not be as pronounced as with a 6-color printer.
6-Color Printers: A 6-color printer produces images with superior color brightness and higher color accuracy. With a moderate price point, 6-color printers are currently the mainstream choice for desktop sublimation. (A 6-color printer is generally the recommended option.)
3. How to Choose the Printer Size?
Printer sizes are typically categorized as A4, A3, or large-format wide printers.
A4 Printers: For beginners focusing on small items such as mugs, phone cases, coasters, or keychains, an A4-sized printer is sufficient. The A4 paper dimensions adequately cover these products without the image area being insufficient.
A3 Printers: For creating larger products like tote bags or cushions, an A3-sized printer is recommended. This format accommodates a wider variety of heat transfer product dimensions. (An A3 printer is often the preferred recommendation as it can also print A4-sized images.)
Wide-Format Printers: For producing very large prints, such as 1.2-meter wide fabric, investment in a wide-format printer is necessary (which entails significantly higher costs).
Common Printer Problem Analysis
1. How to Address Nozzle Clogging (Broken Lines/Missing Colors) After Extended Use?
Over time, users may observe streaks, missing colors, or fine stray ink dots on printed images. This is typically caused by clogged printer nozzles, a phenomenon commonly referred to as “broken lines” or “missing colors.” This is a normal occurrence resulting from factors such as the inherent corrosiveness of sublimation ink or the presence of microscopic impurities.
Troubleshooting Steps:
Diagnose: Initiate the printer’s built-in nozzle check function to print a test page and identify the specific color(s) affected by clogging.
Clean: Utilize the printhead cleaning utility within the printer driver to perform one cleaning cycle.
Verify: Print another test page and compare it to the previous one to assess improvement.
Repeat if Necessary: If improvement is observed, another cleaning cycle may be performed, followed by another test page. (Note: Avoid continuous, uninterrupted cleaning cycles, as this may potentially damage the printhead.)
Address Minor Clogs: If, after several cycles, the test page shows only minor broken lines, discontinue cleaning cycles. Instead, print several pages of a solid color block corresponding to the affected color using plain waste paper. Subsequently, print another nozzle check; the issue is often resolved through this method.
Perform a Powerful Cleaning: If the problem persists, ensure the ink tanks are full and allow the printer to rest for 24 hours. Then, execute the “Powerful Cleaning” or “Heavy Cleaning” option found in the printer’s maintenance utilities. Perform this cycle once and then print a final test page. This procedure typically resolves persistent clogging.
(Important Note: Printer nozzles are prone to clogging during periods of inactivity. It is advisable to print a few images every few days to maintain nozzle clarity.)
2. What Causes Ink Marks or Dots in the Blank Areas of Printed Images?
The appearance of fine lines or dots (sometimes described as “ant trails”) in blank areas is often due to ink residue accumulated on the small paper feed gears within the printer. This residue can smudge the freshly printed, incompletely dried image as it feeds through.
Solution: Gently clean the affected gears using a cotton swab lightly moistened with alcohol. Allow the gears to dry before printing again. Alternatively, switching to a quick-dry sublimation paper can also mitigate this issue.
3. How to Resolve Inaccurate Printed Image Dimensions?
If the final printed dimensions do not match the specified settings, it indicates a configuration error in the print workflow.
Solution: Always use graphic design software for image layout and printing.
Workflow: Create a new document canvas matching your paper size (e.g., A4). Place your images onto this canvas, scaling them to the desired final dimensions. Print directly from this software.
Verification: Ensure that the paper size selected in the printer driver’s settings (e.g., A4) corresponds exactly to the canvas size set in your design software.
Resolution: For optimal print quality and dimensional accuracy, set the image resolution to a minimum of 300 DPI (dots per inch) within your design software.
4. How to Address Color Deviation in Printed Output?
Color variation between the final print and the source image is a common challenge in the printing industry.
Troubleshooting and Calibration:
Evaluate After Transfer: Do not evaluate color based solely on the sublimation paper print. The final color is realized only after the image has been transferred onto the target substrate (e.g., a metal lighter). Always compare the color of the transferred image to the original digital file.
Check for Nozzle Clogs: If the transferred image shows significant color deviation, first verify the printer’s nozzle check to rule out any clogging. If clogs are present, perform cleaning procedures as outlined in Problem #1.
Manual Color Adjustment: If nozzles are clear, compare the transferred image to the original. Determine the dominant color cast (e.g., too much cyan, too much magenta). Adjust the corresponding color values in your design software or printer driver settings. Print another test, transfer it, and repeat this process iteratively until the color match is satisfactory.
Utilize ICC Profiles: For more precise and consistent color management, request an ICC (International Color Consortium) profile from your sublimation ink supplier. This profile is calibrated for your specific combination of printer, ink, and paper.
(Technical Note: It is important to understand that printed output utilizes the CMYK (Cyan, Magenta, Yellow, Key/Black) color model, while computer monitors and mobile screens display colors using the RGB (Red, Green, Blue) model. Due to this fundamental difference in color gamut, some degree of color variation (typically within a range of 5-10%) is considered normal and unavoidable.)